In this part, we will leverage the knowledge from my previous article, Rounded buttons with shadow that work in Outlook, to build an inline rounded tag. We use these tags to simply highlight or exclude a specific piece of text from the rest of the content:
You would think that the experience with rounded buttons brings enough knowledge to achieve that. Little did we know at the beginning that what seems to work in a context of a block element isn’t the same in the context of inline content.
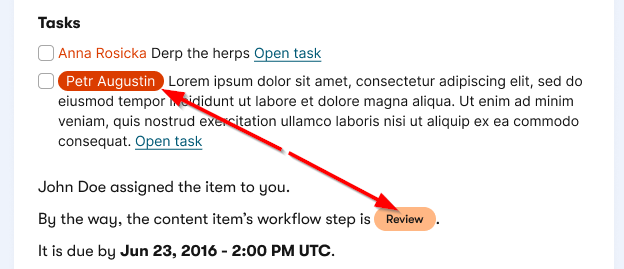
Here is the basic rounded tag code. Note that to support Outlook, it requires logic for estimating the width based on the length of the highlighted text (here it’s 78px).
The tag text is not aligned vertically with the rest of the text.
It also doesn’t work well with longer texts. They either get cut by wrapping the text into new invisible lines, or they may distort your layout by being too wide.
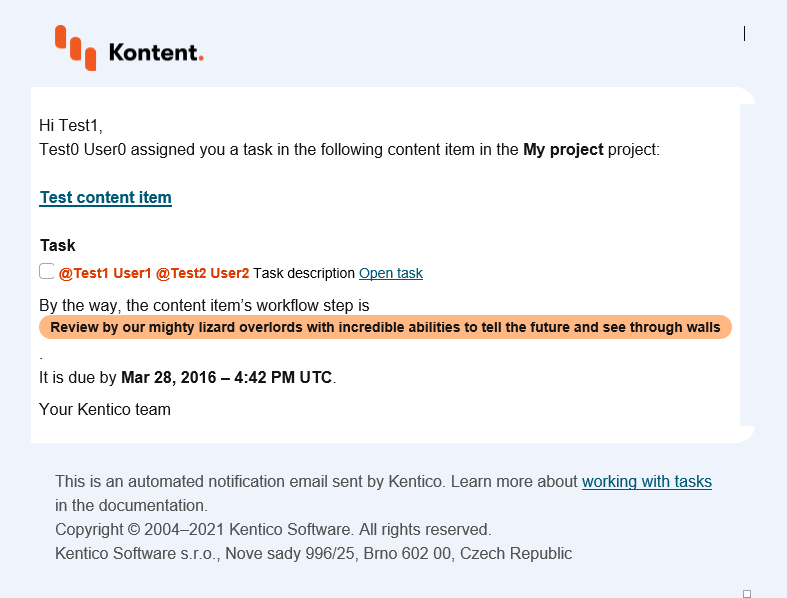
See this purposely exaggerated example. The last word, “walls,” is cut and placed on the next hidden line, and the layout is broken:
Making the content fit
As always, there is a simple HTML solution for standard clients by using white-space: nowrap and text-overflow: ellipsis. But Outlook doesn’t support any of that, so we need to add an extra mso-wrap-style:none style to the v:roundrect VML object for Outlook.
This has two consequences:
Text will no longer wrap when it won’t fit.
If there is not enough horizontal space, the object will resize based on its content.
The latter also means the object will expand even more and keep breaking our layout:
You may also notice that the side spacing within the highlighted text got limited to a bare minimum.
As there is no concept of explicit internal padding in VML objects, you need to work around it. We are using explicit chars around the object text to achieve that. This is not a precise adjustment, but it gets the job done.
Now we need to make sure that the object won’t get larger than desired. And if it does, shorten it and add the ellipsis character (three dots, also known as dot-dot-dot).
Email clients don’t allow us to execute dynamic scripts, so we do the checks in the code that generates the email body.
We define the maximum width available and determine the character limit based on the same logic that we used for the width calculation earlier. Simple, but effective:
We give it a bit of breathing space, as the workflow tag may be used in various places, so we don’t even target 100% of the available width. More like 85–90%.
Vertical alignment of inline content
The last issue to solve is to align the text of the rounded tag vertically with the rest of the text on the same line.
The first idea that comes to mind is to leverage the position:relative position adjustment that we have used for the button.
Unfortunately, this doesn’t work as it would in standard HTML because the reference frame for the relative position is the parent block element and not the original position of the element that you’re adjusting.
So applying the relative position not only takes away the space necessary for the workflow label but also positions it completely out of its original context:
I also tried to nest the v:roundrect in another VML object or group, but, based on my observations, such complex VML structures are not supported by Outlook at all. It can only handle one level of VML objects and their properties.
I couldn’t find any other suitable solution using VML, however, coming across this information about vertical-align in Campaign Monitor’s overview, I found out that it should be more or less supported by all email clients.
After a bit of experimenting and testing with vertical-align, I discovered the following:
Keyword values for vertical-align either do not work or do not provide good reference points to get the proper vertical alignment that we need.
Values in px in a standard HTML element (SPAN in our case) seem to work well in Outlook and even adjust the position of a nested VML object which is exactly what we need.
HTML-based email clients properly align the content just based on the existing HTML and CSS, and the px adjustment misaligns it, so we only want to apply it for Outlook.
So what I did was just conditionally wrapping the workflow label with a SPAN that uses hardcoded vertical-align:-6px. That’s it.
Here is the final code of the workflow label we are now using:
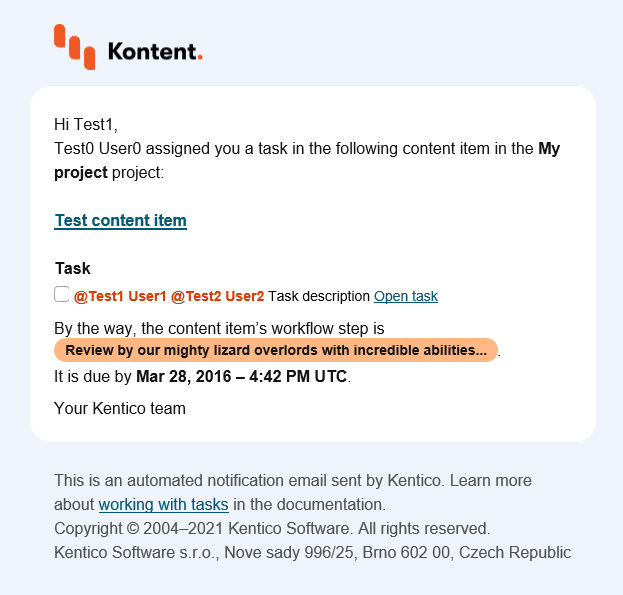
With this final adjustment, the workflow label gets aligned properly:
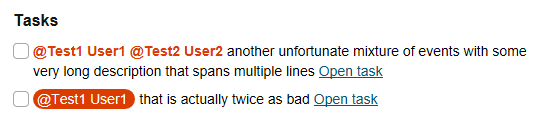
The same principles apply to the mentions too:
What’s next?
This was the third part of the Implementing emails in 2021 series, but there is still more to learn. Continue with one of these articles based on what interests you the most or read the entire series:
What if we told you there was a way to make your website a place that will always be relevant, no matter the season or the year? Two words—evergreen content. What does evergreen mean in marketing, and how do you make evergreen content? Let’s dive into it.
How can you create a cohesive experience for customers no matter what channel they’re on or what device they’re using? The answer is going omnichannel.
In today’s world of content, writing like Shakespeare is not enough. The truth is, there are tons of exceptional writers out there. So what will make you stand out from the sea of articles posted every day? A proper blog post structure.
Lucie Simonova
Subscribe to the Kontent.ai newsletter
Get the hottest updates while they’re fresh! For more industry insights, follow our LinkedIn profile.