Implementing emails in 2021: How to add rounded corners to containers in Outlook

Rounded corners and Outlook. Sounds simple, right? There are several approaches to implementing them, yet none of them are simple. So which is the best one?

Martin Hejtmanek

Martin Hejtmanek

Published on Aug 11, 2021

This article is the last part of the Implementing emails in 2021 series. If you missed the introduction, read Basics & how to test generated emails.

I have discussed the usage of VML objects to leverage support for rounded corners in Outlook in my previous articles about rounded buttons and rounded inline tags.

In this last part, I will show you how we implemented rounded corners for a general container that we use to wrap the body part of the email and a table-like presentation of a comment thread rendered within the email.

What’s so complicated?

You may be wondering why rounded corners already used in the previous articles need another article. The problem is that the previous solutions show a very simple VML object with plain text, which has a defined height and width.

That doesn’t work in the case of general containers that include:

  • Rich content, such as headings, links, tables
  • Nested VML objects, e.g., buttons, workflow tags—as I said in the article about rounded buttons, nested VML objects are not really supported by Outlook

Besides that, making a VML object containing such content behave similarly to DIV elements is very complicated.

When you start googling, you can find various solutions:

  • v:textbox with style="mso-fit-shape-to-text:true" which expands the height of the object to the size needed for its content.
  • v:rect / v:roundrect with style="mso-width-percent:1000;" which didn’t work for me in Outlook 2016 as the articles about it suggested. Either something changed, or I am missing some piece of the puzzle.

However, no matter what I tried, I wasn’t able to apply all of those features at once successfully. Something always didn’t work.

And finally, rounded corners in v:roundrect are defined in percentage of the size of the container, so even if you define it in some seemingly meaningful way, once the container resizes, the corners get distorted due to scaling.

What didn’t work

Let me show you the best I could get with that approach. I simplified it to give you a better idea:

<v:roundrect style="width:568px;height:800px;" arcsize="3%" stroke="f" fill="true" fillcolor="#ffffff" xmlns:v="urn:schemas-microsoft-com:vml" xmlns:w="urn:schemas-microsoft-com:office:word">
    <v:textbox style="mso-fit-shape-to-text:true" inset="0,0,0,0">
        <p>1</p><p>2</p><p>3</p><p>4</p><p>5</p><p>6</p>
        [BUTTON CODE]
        <p>A</p><p>B</p><p>C</p><p>D</p><p>E</p><p>F</p>
    </v:textbox>
</v:roundrect>

This example uses:

  • v:roundrect container with a fixed width of 568px, as I couldn’t make mso-width-percent work properly to expand the object to 100% width.
  • Previously working button code from the article about rounded buttons.
  • v:textbox content container with mso-fit-shape-to-text:true to ensure the automatic height of the container.
  • Enough content to produce a larger height than the width of the container.
  • arcsize="3%" which roughly corresponds to 16px/568px as our desired border-radius is 16px.

It produces the following result:

As you can see, the rounded corners are pretty much what we would expect, but the button is completely broken. This is because VML object nesting is not supported. The objects display, but their positioning reference frame is the one above the container. That renders nested VML completely unusable for our scenarios.

Moreover, if we look at the roundrect element definition, the arcsize property says the following: “Defines rounded corners as a percentage of half the smaller dimension of the rectangle.”

This means that if there is not enough content and the container is shorter than the defined width, our rounded corners get reduced.

A mixed solution that works

In order to come up with a real solution that works for a general container, you need to step out of the box a little bit and leave the idea of the container being a single entity.

Let me summarize some facts we will build on:

  • VML is powerful but cannot be used as a wrapper, as we also need the internal content to sometimes use VML objects.
  • TABLE and TD work nicely as general containers.

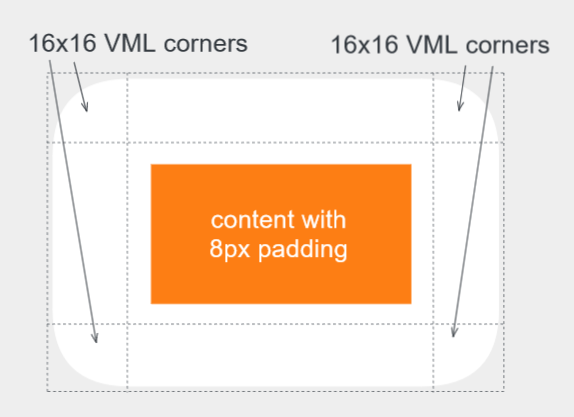
Remember the 3x3 table layout with fixed perimeter cell sizes from the previous article? Now is the time to use it and expand it to our needs.

Our body container has a padding of 24px and a border-radius of 16px.

We’re going to use what we’ve learned about buttons with shadow, as well as the spacing and layout, and we’re going to break down our container into several parts.

The plan is the following:

  • Each of the corner cells will contain an arc simulating the particular border-radius for both the background and border.
  • The rest of the perimeter cells are standard cells that fill the empty space between corners and provide the respective side border when needed.
  • The content cell padding is reduced by the border-radius size to make the correct total padding of the container.

As VML objects are only supported by Outlook, there will also be standard border radiuses and borders in the corner cells for other email clients.

This approach brings one limitation. The inner padding of the container needs to be at least the same size as its border-radius. But this is usually met in most of the designs.

Building the corners

Before we get to a complete container with 4 corners, let’s discuss how to make a VML arc for a specific corner.

Using an arc element for an arc?

It seems like an obvious choice. VML offers an arc element, but it behaves differently than you might expect. This is the testing code I used, I placed it into a simple table container without padding from the article about spacing to better demonstrate how it works:

<v:arc style="width: 100px;height:100px;" startangle="270" endangle="360" fillcolor="#ff0000" stroke="f" fill="true" xmlns:v="urn:schemas-microsoft-com:vml" xmlns:w="urn:schemas-microsoft-com:office:word">
</v:arc>

It gives us the following result:

Not only does it allocate the whole 100x100px for the original circle (note the box height) instead of just the quarter, but it also doesn’t connect the ends with the center but instead with each other. As we need it to cover the whole corner and remove the full-cell background, it is not usable in our case.

Shape element to save the day!

Luckily, there is a pretty versatile shape element that can be used for basically any shape just as in SVG. Only the syntax is a bit different than in SVG.

I came up with the following code of the top left corner with a background:

<v:shape style="width:16px;height:16px;" coordorigin="0 0" coordsize="2 2" fillcolor="#ff0000" stroke="f" fill="true" xmlns:v="urn:schemas-microsoft-com:vml" xmlns:w="urn:schemas-microsoft-com:office:word">
    <v:path v="m 0,2 c 0,1,1,0,2,0 l 2,2 x"/>
</v:shape>

Similar to SVG, a VML shape has a view box that defines a local coordinate system with coordorigin and coordsize attributes. I am using a view box of 2x2 as I need to place some points on the exact half of the bounding square side.

My path is always the following:

  1. Starting at the counter-clockwise end of the arc.
  2. A Bezier curve to the clockwise end of the arc with the middle points in the middle of the respective sides. This makes a quarter-circle (the actual arc).
  3. A line to the center of the circle.
  4. And finally, closing the shape which makes a line to its start.

This is its output which does exactly what we need:

Making rounded borders is very similar, with a few adjustments. We need the border to be rendered only at the rounded part, so the path only contains the first two steps making the arc, without any closure. At the same time, it uses stroke instead of the fill:

<v:shape style="width:16px;height:16px;" coordorigin="0 0" coordsize="2 2" stroke="true" strokecolor="#ff0000" fill="f" xmlns:v="urn:schemas-microsoft-com:vml" xmlns:w="urn:schemas-microsoft-com:office:word">
    <v:path v="m 0,2 c 0,1,1,0,2,0"/>
</v:shape>

 With the following output:

Corner for a standard email client

I have discussed the VML corners, but they only apply to Outlook. For other email clients, we need to stick to the standard approach using CSS properties.

With the same layout in mind, we just apply those to each of the cells individually. Here is an example of such a corner cell: 

<td style="font-size: 0;margin: 0;padding: 0;margin-top: 0;width: 16px;height: 16px;border-top-left-radius: 16px;background-color: #ff0000">
</td>

This produces the very same result in a standard email client as a VML corner does in Outlook. We will need to combine the two to provide a consistent result, but I will get back to that in a few moments.

Building a complete container

Now let’s look at how we can apply these pieces to build a complete container.

Border-only container

In order to use a rounded border, we need to provide two alternatives in the email body. One with a VML object, and one for other clients. 

The standard email clients will need both the border and border-radius set, but since Outlook doesn’t support border-radius, it would make a sharp corner in Outlook. That’s why we need to add an extra condition to use either one or the other. We will use the negative condition <!--[if !mso]><!--> for non-Outlook email clients from my first article.

Here is the full code of a border-only container with 16px rounded corners and total internal padding of 24px:

<table style="margin: 0;padding: 0;border-spacing: 0;overflow: hidden;" cellspacing="0" cellpadding="0" border="0" width="100%">
    <tbody style="margin: 0;padding: 0;">
        <tr style="margin: 0;padding: 0;">
            <!--[if mso]>
            <td style="margin:0;padding:0;font-size:0;width:16px;height:16px;">
                <v:shape style="width:16px;height:16px;" coordorigin="0 0" coordsize="2 2" strokecolor="#ff0000" strokeweight="1px" stroke="true" fill="f" xmlns:v="urn:schemas-microsoft-com:vml" xmlns:w="urn:schemas-microsoft-com:office:word">
	                <v:path v="m 0,2 c 0,1,1,0,2,0"/>
                </v:shape>
            </td>
            <![endif]-->
            <!--[if !mso]><!-->
            <td style="font-size: 0;margin: 0;padding: 0;width: 16px;height: 16px;border-top-left-radius: 16px;border-top: solid 1px #ff0000;border-left: solid 1px #ff0000;">
            </td>
            <!--<![endif]-->
            
	    <td style="font-size: 0;margin: 0;padding: 0;;border-top: solid 1px #ff0000;">
	    </td>

            <!--[if mso]>
            <td style="margin:0;padding:0;font-size:0;width:16px;height:16px;">
                <v:shape style="width:16px;height:16px;" coordorigin="0 0" coordsize="2 2" strokecolor="#ff0000" strokeweight="1px" stroke="true" fill="f" xmlns:v="urn:schemas-microsoft-com:vml" xmlns:w="urn:schemas-microsoft-com:office:word">
	                <v:path v="m 0,0 c 1,0,2,1,2,2"/>
                </v:shape>
            </td>
            <![endif]-->
            <!--[if !mso]><!-->
            <td style="font-size: 0;margin: 0;padding: 0;width: 16px;height: 16px;border-top-right-radius: 16px;border-top: solid 1px #ff0000;border-right: solid 1px #ff0000;">
            </td>
            <!--<![endif]-->
        </tr>

	<tr style="margin: 0;padding: 0">
	    <td style="font-size: 0;margin: 0;padding: 0;padding-top: 8px;padding-bottom: 8px;border-left: solid 1px #ff0000;"></td>
	
	    <td style="font-family: Helvetica, sans-serif;font-size: 16px;margin: 0;padding: 8px 8px 8px 8px;font-weight: normal;line-height: 24px;">
	        [CONTENT]
	    </td>
	
            <td style="font-size: 0;margin: 0;padding: 0;padding-top: 8px;padding-bottom: 8px;;border-right: solid 1px #ff0000;"></td>
	</tr>

        <tr style="margin: 0;padding: 0">
            <!--[if mso]>
            <td style="margin:0;padding:0;font-size:0;width:16px;height:16px;">
                <v:shape style="width:16px;height:16px;" coordorigin="0 0" coordsize="2 2" strokecolor="#ff0000" strokeweight="1px" stroke="true" fill="f" xmlns:v="urn:schemas-microsoft-com:vml" xmlns:w="urn:schemas-microsoft-com:office:word">
	                <v:path v="m 2,2 c 1,2,0,1,0,0"/>
                </v:shape>
            </td>
            <![endif]-->
            <!--[if !mso]><!-->
            <td style="font-size: 0;margin: 0;padding: 0;width: 16px;height: 16px;border-bottom-left-radius: 16px;border-bottom: solid 1px #ff0000;border-left: solid 1px #ff0000;">
            </td>
            <!--<![endif]-->
            
	    <td style="font-size: 0;margin: 0;padding: 0;border-bottom: solid 1px #ff0000;">
	    </td>
        
            <!--[if mso]>
            <td style="margin:0;padding:0;font-size:0;width:16px;height:16px;">
                <v:shape style="width:16px;height:16px;" coordorigin="0 0" coordsize="2 2" strokecolor="#ff0000" strokeweight="1px" stroke="true" fill="f" xmlns:v="urn:schemas-microsoft-com:vml" xmlns:w="urn:schemas-microsoft-com:office:word">
	                <v:path v="m 2,0 c 2,1,1,2,0,2"/>
                </v:shape>
            </td>
            <![endif]-->
            <!--[if !mso]><!-->
            <td style="font-size: 0;margin: 0;padding: 0;width: 16px;height: 16px;border-bottom-right-radius: 16px;border-bottom: solid 1px #ff0000;border-right: solid 1px #ff0000;">
            </td>
            <!--<![endif]-->
        </tr>
    </tbody>
</table>

With the following result:

It works perfectly in standard email clients, but there is one small catch that you may notice in Outlook.

It doesn’t position the shape precisely and leaves a small space between the corners and their neighbor cells. You will need to compensate for that a little bit, but I will leave it for now and get back to that in the final solution.

Background-only container

Let’s look at what happens if we apply the same principles to a background-only container. The background-only container works the same way, just using a slightly different shape and background-color property in the table cells instead of border CSS properties.

Here is the full code of a background-only container with 16px rounded corners and total internal padding of 24px:

<table style="margin: 0;padding: 0;border-spacing: 0;border-radius: 16px 16px 16px 16px;overflow: hidden;background-image: linear-gradient(#ffffff, #ffffff)" cellspacing="0" cellpadding="0" border="0" width="100%">
    <tbody style="margin: 0;padding: 0;">
        <tr style="margin: 0;padding: 0;margin-top: 0">
            <!--[if mso]>
            <td style="margin:0;padding:0;font-size:0;width:16px;height:16px;">
                <v:shape style="width:16px;height:16px;" coordorigin="0 0" coordsize="2 2" fillcolor="#ffffff" stroke="f" fill="true" xmlns:v="urn:schemas-microsoft-com:vml" xmlns:w="urn:schemas-microsoft-com:office:word">
                    <v:path v="m 0,2 c 0,1,1,0,2,0 l 2,2 x"/>
                </v:shape>
            </td>
            <![endif]-->
            <!--[if !mso]><!-->
            <td style="font-size: 0;margin: 0;padding: 0;width: 16px;height: 16px;border-top-left-radius: 16px;background-color: #ffffff">
            </td>

            <!--<![endif]-->
            <td style="font-size: 0;margin: 0;padding: 0;background-color: #ffffff">
            </td>

            <!--[if mso]>
            <td style="margin:0;padding:0;font-size:0;width:16px;height:16px;">
                <v:shape style="width:16px;height:16px;" coordorigin="0 0" coordsize="2 2" fillcolor="#ffffff" stroke="f" fill="true" xmlns:v="urn:schemas-microsoft-com:vml" xmlns:w="urn:schemas-microsoft-com:office:word">
                    <v:path v="m 0,0 c 1,0,2,1,2,2 l 0,2 x"/>
                </v:shape>
            </td>
            <![endif]-->
            <!--[if !mso]><!-->
            <td style="font-size: 0;margin: 0;padding: 0;width: 16px;height: 16px;border-top-right-radius: 16px;background-color: #ffffff">
            </td>
            <!--<![endif]-->
        </tr>

        <tr style="margin: 0;padding: 0">
            <td style="font-size: 0;margin: 0;padding: 0;margin-top: 0;padding-top: 8px;padding-bottom: 8px;background-color: #ffffff"></td>

            <td style="font-family: Helvetica, sans-serif;font-size: 16px;margin: 0;padding: 8px;font-weight: normal;line-height: 24px;background-color: #ffffff">
                [CONTENT]
            </td>

            <td style="font-size: 0;margin: 0;padding: 0;padding-top: 8px;padding-bottom: 8px;background-color: #ffffff"></td>
        </tr>
    
        <tr style="margin: 0;padding: 0">
            <!--[if mso]>
            <td style="margin:0;padding:0;font-size:0;width:16px;height:16px;">
                <v:shape style="width:16px;height:16px;" coordorigin="0 0" coordsize="2 2" fillcolor="#ffffff" stroke="f" fill="true" xmlns:v="urn:schemas-microsoft-com:vml" xmlns:w="urn:schemas-microsoft-com:office:word">
                    <v:path v="m 2,2 c 1,2,0,1,0,0 l 2,0 x"/>
                </v:shape>
            </td>
            <![endif]-->
            <!--[if !mso]><!-->
            <td style="font-size: 0;margin: 0;padding: 0;width: 16px;height: 16px;border-bottom-left-radius: 16px;background-color: #ffffff">
            </td>
            <!--<![endif]-->
            
            <td style="font-size: 0;margin: 0;padding: 0;background-color: #ffffff">
            </td>
        
            <!--[if mso]>
            <td style="margin:0;padding:0;font-size:0;width:16px;height:16px;">
                <v:shape style="width:16px;height:16px;" coordorigin="0 0" coordsize="2 2" fillcolor="#ffffff" stroke="f" fill="true" xmlns:v="urn:schemas-microsoft-com:vml" xmlns:w="urn:schemas-microsoft-com:office:word">
                    <v:path v="m 2,0 c 2,1,1,2,0,2 l 0,0 x"/>
                </v:shape>
            </td>
            <![endif]-->
            <!--[if !mso]><!-->
            <td style="font-size: 0;margin: 0;padding: 0;width: 16px;height: 16px;border-bottom-right-radius: 16px;background-color: #ffffff">
            </td>
            <!--<![endif]-->
        </tr>
    </tbody>
</table>

When trying it, I intentionally kept the original email content so you can see how nicely it supports rich content even with VML objects:

Similar to the previous border-only solution, the shapes are a bit off. We will compensate for them in a few moments as well.

A complete solution with border and background

The two remaining issues to solve are the following:

  1. Compensate for the extra space in Outlook.
  2. Allow a container with rounded corners having both border and background, which means essentially using two VML shapes at the same place. Does this sound familiar? 

We already know the solution for the latter. We have discussed it in the article about buttons where we placed the button above another VML object simulating the shadow.

The solution for both issues is position: relative.

So I placed both background and border shapes (in this order) to each of the corner cells and positioned them relatively with a minor 0.5px adjustment in their positions.

Here is the final code of the container with both background and border supported. I included an extra red border to the body container just for the sake of this example:

<table style="margin: 0;padding: 0;border-spacing: 0;overflow: hidden;" cellspacing="0" cellpadding="0" border="0" width="100%">
    <tbody style="margin: 0;padding: 0;">
        <tr style="margin: 0;padding: 0;">
            <!--[if mso]>
            <td style="margin:0;padding:0;font-size:0;width:16px;height:16px;">
                <v:shape style="width:16px;height:16px;position:relative;top:0.5px;left:0.5px;" coordorigin="0 0" coordsize="2 2" fillcolor="#ffffff" stroke="f" fill="true" xmlns:v="urn:schemas-microsoft-com:vml" xmlns:w="urn:schemas-microsoft-com:office:word">
                    <v:path v="m 0,2 c 0,1,1,0,2,0 l 2,2 x"/>
                </v:shape>

                <v:shape style="width:16px;height:16px;position:relative;top:-0.5px;left:0.5px;" coordorigin="0 0" coordsize="2 2" strokecolor="#ff0000" strokeweight="1px" stroke="true" fill="f" xmlns:v="urn:schemas-microsoft-com:vml" xmlns:w="urn:schemas-microsoft-com:office:word">
	                <v:path v="m 0,2 c 0,1,1,0,2,0"/>
                </v:shape>
            </td>
            <![endif]-->
            <!--[if !mso]><!-->
            <td style="font-size: 0;margin: 0;padding: 0;width: 16px;height: 16px;border-top-left-radius: 16px;background-color: #ffffff;border-top: solid 1px #ff0000;border-left: solid 1px #ff0000;">
            </td>
            <!--<![endif]-->
            
	        <td style="font-size: 0;margin: 0;padding: 0;background-color: #ffffff;border-top: solid 1px #ff0000;">
	        </td>

            <!--[if mso]>
            <td style="margin:0;padding:0;font-size:0;width:16px;height:16px;">
                <v:shape style="width:16px;height:16px;position:relative;top:0.5px;left:-0.5px;" coordorigin="0 0" coordsize="2 2" fillcolor="#ffffff" stroke="f" fill="true" xmlns:v="urn:schemas-microsoft-com:vml" xmlns:w="urn:schemas-microsoft-com:office:word">
                    <v:path v="m 0,0 c 1,0,2,1,2,2 l 0,2 x"/>
                </v:shape>

                <v:shape style="width:16px;height:16px;position:relative;top:-0.5px;left:-0.5px;" coordorigin="0 0" coordsize="2 2" strokecolor="#ff0000" strokeweight="1px" stroke="true" fill="f" xmlns:v="urn:schemas-microsoft-com:vml" xmlns:w="urn:schemas-microsoft-com:office:word">
	                <v:path v="m 0,0 c 1,0,2,1,2,2"/>
                </v:shape>
            </td>
            <![endif]-->
            <!--[if !mso]><!-->
            <td style="font-size: 0;margin: 0;padding: 0;width: 16px;height: 16px;border-top-right-radius: 16px;background-color: #ffffff;border-top: solid 1px #ff0000;border-right: solid 1px #ff0000;">
            </td>
            <!--<![endif]-->
        </tr>

	<tr style="margin: 0;padding: 0">
	    <td style="font-size: 0;margin: 0;padding: 0;padding-top: 8px;padding-bottom: 8px;background-color: #ffffff;border-left: solid 1px #ff0000;"></td>
	
	    <td style="font-family: Helvetica, sans-serif;font-size: 16px;margin: 0;padding: 8px 8px 8px 8px;font-weight: normal;line-height: 24px;background-color: #ffffff">
		    [CONTENT]
	    </td>
	
	    <td style="font-size: 0;margin: 0;padding: 0;padding-top: 8px;padding-bottom: 8px;background-color: #ffffff;border-right: solid 1px #ff0000;"></td>
	</tr>

        <tr style="margin: 0;padding: 0">
            <!--[if mso]>
            <td style="margin:0;padding:0;font-size:0;width:16px;height:16px;">
                <v:shape style="width:16px;height:16px;position:relative;top:-0.5px;left:0.5px;" coordorigin="0 0" coordsize="2 2" fillcolor="#ffffff" stroke="f" fill="true" xmlns:v="urn:schemas-microsoft-com:vml" xmlns:w="urn:schemas-microsoft-com:office:word">
                    <v:path v="m 2,2 c 1,2,0,1,0,0 l 2,0 x"/>
                </v:shape>

                <v:shape style="width:16px;height:16px;position:relative;top:-0.5px;left:0.5px;" coordorigin="0 0" coordsize="2 2" strokecolor="#ff0000" strokeweight="1px" stroke="true" fill="f" xmlns:v="urn:schemas-microsoft-com:vml" xmlns:w="urn:schemas-microsoft-com:office:word">
	                <v:path v="m 2,2 c 1,2,0,1,0,0"/>
                </v:shape>
            </td>
            <![endif]-->
            <!--[if !mso]><!-->
            <td style="font-size: 0;margin: 0;padding: 0;width: 16px;height: 16px;border-bottom-left-radius: 16px;background-color: #ffffff;border-bottom: solid 1px #ff0000;border-left: solid 1px #ff0000;">
            </td>
            <!--<![endif]-->
            
	    <td style="font-size: 0;margin: 0;padding: 0;background-color: #ffffff;border-bottom: solid 1px #ff0000;">
	    </td>
        
            <!--[if mso]>
            <td style="margin:0;padding:0;font-size:0;width:16px;height:16px;">
                <v:shape style="width:16px;height:16px;position:relative;top:-0.5px;left:-0.5px;" coordorigin="0 0" coordsize="2 2" fillcolor="#ffffff" stroke="f" fill="true" xmlns:v="urn:schemas-microsoft-com:vml" xmlns:w="urn:schemas-microsoft-com:office:word">
                    <v:path v="m 2,0 c 2,1,1,2,0,2 l 0,0 x"/>
                </v:shape>

                <v:shape style="width:16px;height:16px;position:relative;top:-0.5px;left:-0.5px;" coordorigin="0 0" coordsize="2 2" strokecolor="#ff0000" strokeweight="1px" stroke="true" fill="f" xmlns:v="urn:schemas-microsoft-com:vml" xmlns:w="urn:schemas-microsoft-com:office:word">
	                <v:path v="m 2,0 c 2,1,1,2,0,2"/>
                </v:shape>
            </td>
            <![endif]-->
            <!--[if !mso]><!-->
            <td style="font-size: 0;margin: 0;padding: 0;width: 16px;height: 16px;border-bottom-right-radius: 16px;background-color: #ffffff;border-bottom: solid 1px #ff0000;border-right: solid 1px #ff0000;">
            </td>
            <!--<![endif]-->
        </tr>
    </tbody>
</table>

This is its final output in Outlook:

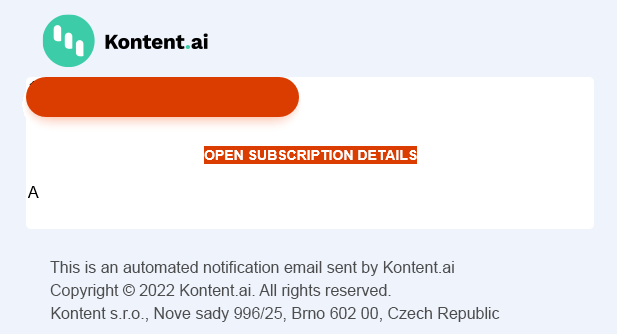
The solution isn’t perfect with sharp colors, but it’s as good as it gets with Outlook. With softer colors, it blends, and the minor issues are barely noticeable.

This final code supports all combinations shown in this article. If you only need background or border, just remove the respective shape and CSS. I have demonstrated both to show you what you need to keep in mind when developing a solution like this.

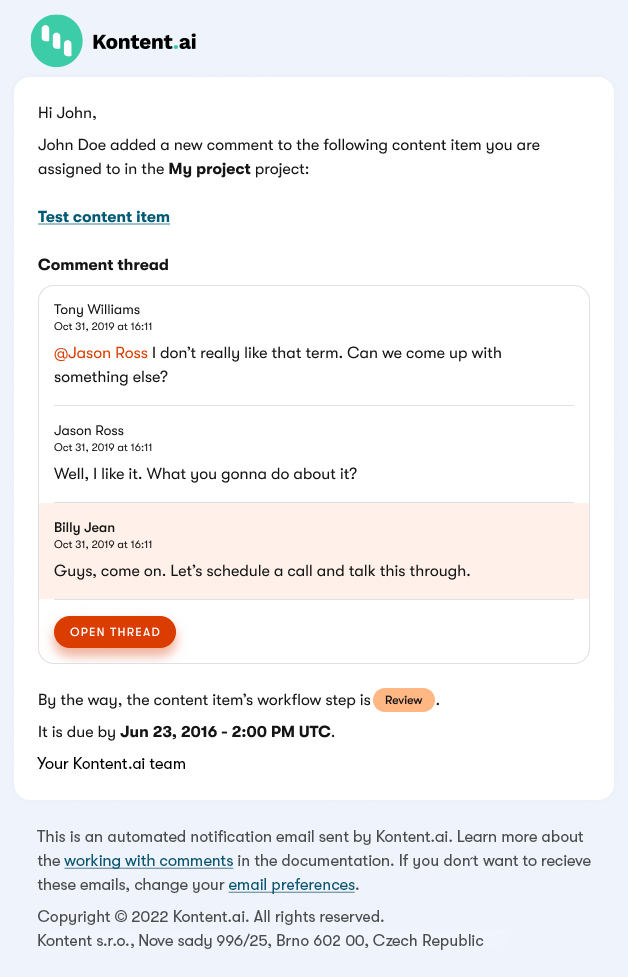
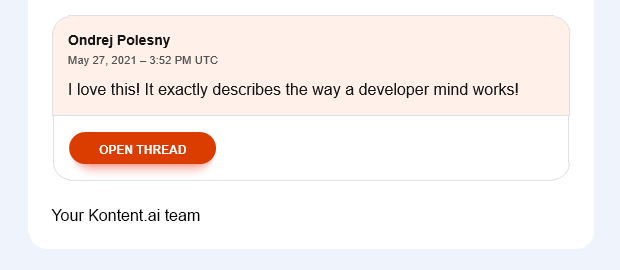
This is what our standard email body looks like, using just the background:

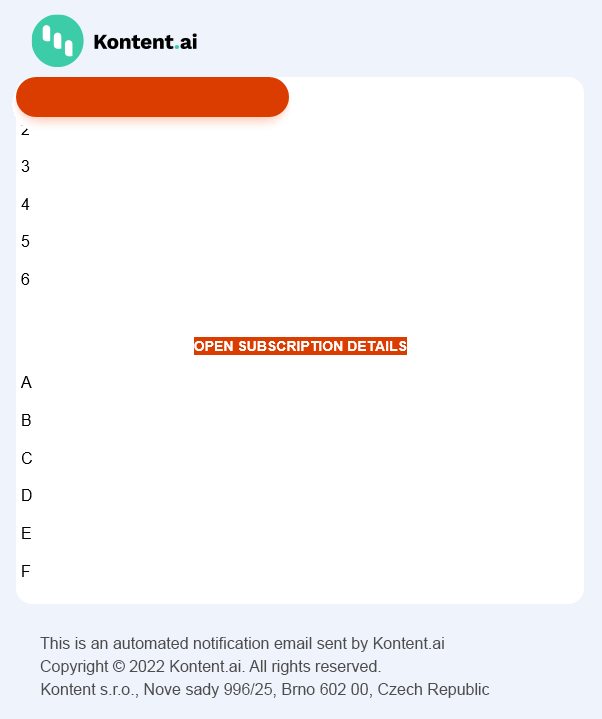
And here is how we use the same with border and background combined. This one comes from a real email notification triggered by my colleague while reviewing one of these articles:

Other possible, but ineffective solutions

There were other potential solutions that I considered, but none of them “felt right” or provided the desired results:

Pixel-by-pixel layout

Imagine a table where each step is represented by one pixel. By properly organizing those and assigning cells proper colors you basically render a bitmap using HTML elements.

It works, however, it feels the same as drawing Mona Lisa in Excel. Not something I would consider an efficient solution.

But if you want to learn more about this pixel-by-pixel layout, read this article.

Corner images

You can use a similar approach as I used with VML objects in corners but this time with images. Not only does it limit the combinations we can use to images you prepare in advance, but it also comes with the limitations I outlined in the article about email basics.

That’s all I have to say

Thanks for staying with me till the very end! I hope my findings were useful to you and will help you with your email development. If you want to discuss your solutions or share your experience, join our Discord.

In case you missed some topics, here are the links to all my previous articles about redesigning emails:

Have a great time!

Feeling like your brand’s content is getting lost in the noise?

Listen to our new podcast for practical tips, tricks, and strategies to make your content shine. From AI’s magic touch to content management mastery and customer experience secrets, we’ll cover it all.

Kontent Waves

Subscribe to the Kontent.ai newsletter

Stay in the loop. Get the hottest updates while they’re fresh!