Collections
Collections set boundaries for your content items. They let you simplify the organization of your content according to your business structure and needs.
- Your collection and content governance requirements might influence the way you set up your projects.
Add a collection
- In
Environment settings > Collections, click Create new collection.
- Type the new collection name.
- Click Confirm.
- Click Save changes in the top-right corner.
Rename a collection
- In
Environment settings, select Collections.
- Click the collection you want to rename.
- In Collection name, adjust the name.
- Click Confirm.
- Click Save changes in the top-right corner.
Assign user role permissions for collections
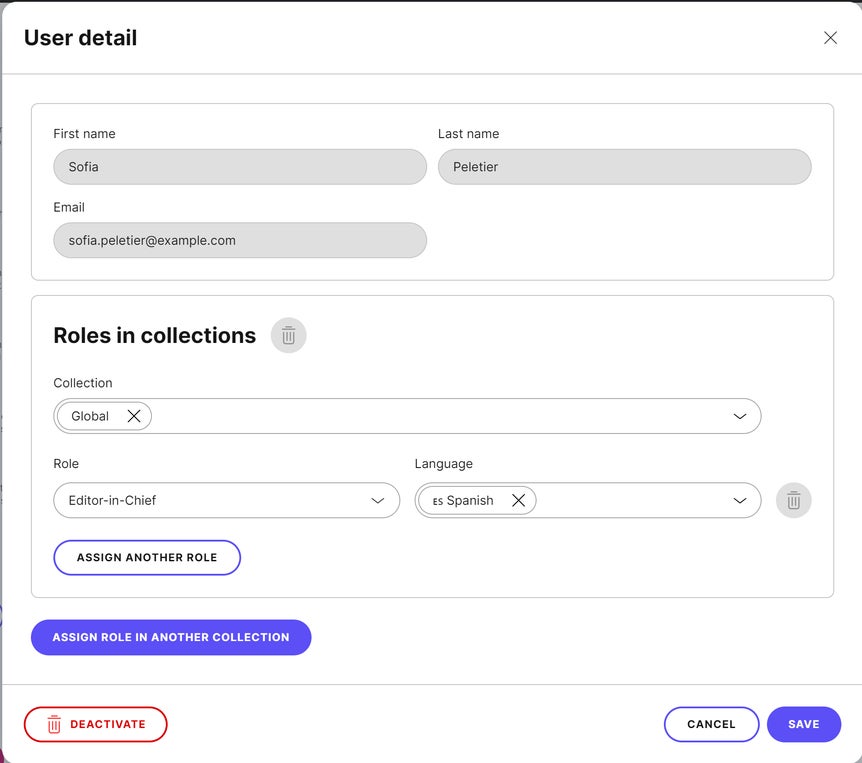
By default, new users have a single role for content in all collections and languages. If you’ve already mapped and established roles for your users, you can assign your users to work on content in specific collections and languages.Only available with advanced collections
This feature isn’t available for some legacy plan subscriptions. Contact us to find out your options.
- In
Environment settings, select Users.
- Click a user to open their details.
- In Collection, select one or more collections.
- In Role, select a role.
- (Optional) In Language, select one or more languages.
- Click Save.
Examples of role permissions
Users can have different roles for each collection. You can also connect permissions to the languages.
Collaboration across collections
Users can see other users’ names only when they have at least one collection in common. Based on the roles in the collections, users might see:- Redacted user names instead of actual names
- Filtered lists of users that contain only the users from the same collections
- Project managers have project-wide access and can see all users.
- Users with the Invite and manage project members permission can manage the environment’s users and see all users.
Assign collections to spaces
If you use spaces to manage multiple websites within one project, you can connect collections to the spaces. Assigning collections to spaces provides a clear overview of what content belongs to which website and simplifies the range of choices content creators have when previewing content in such a project.Move items between collections
Every content item can be moved under a single collection. Your choice of the collection also applies to all variants of the item.- You are assigned to the collections you want to move between.
- In both collections, you have the Edit permission for the content types of the selected items.
- In both collections, you have the Edit permission for all translated variants of the selected items.
- In
Content & assets, open a content item.
- Under the content item name, click Change collection.
- In the Change collection dialog, select a collection from the Move item to drop-down.
- Click Move.
Govern assets with role permissions in collections
You can assign assets to collections to improve your content governance. You set up the role permissions for assets just like for content items. The permissions for assets are set separately from those for content items. After you set up asset permissions for your roles as needed, assign the roles in collections to users in your project.Assign assets to collections
For assets you already have in your asset library:- In
Content & assets, go to the asset library.
- Open an asset’s details.
- Select a collection in the Collection card in the main section.
- Click Save changes.
Remove assets from a collection
When you upload a new asset, select the ∅ Not in collection option to leave the new asset without a collection. To remove existing assets from a collection:- In
Content & assets, go to the asset library.
- Open an asset.
- In Asset collection, select the ∅ Not in collection option.
- Click Save changes.
Bulk operations on assets in collections
You can both assign assets to and remove them from collections in bulk:- In
Content & assets, go to the asset library.
- Select the assets you want to assign to or remove from a collection.
- Click Move asset to collection in the menu bar above the asset grid.
- Select the desired option:
- Select a collection to assign the assets to it.
- Select the ∅ Not in collection option to remove assets from their collections. You can use this even if the selected assets are in various collections.
- Click Change.