Skip navigation

Manage environments

15 min read
Download PDF

Environments in Kontent.ai let you create snapshots of your production project. In non-production environments, you can safely make changes to the content model and the content itself without affecting what your customers see in production.

Table of contents

    Environments and their use

    Environments are a tool for testing purposes, not for content production

    For example, if you need to adjust the existing content model or programmatically modify hundreds of items, we recommend using a non-production environment to test the change before making it in production.

    By default, every Kontent.ai project comes with an environment called Production. You can rename this environment to anything you like such as main or live. As long as the environment is marked as production, it cannot be deleted.

    For content production and preview purposes, use an environment marked as production.

    Continuous integration with environments

    Let's say you want to change the way you use images in your project and move towards using assets in components. To do that, you need to create a content type for the components and migrate all the image assets to components of that type.

    As with all changes to the content model, it's best to validate what you're doing in a non-production environment first.

    1. Create a new environment to have a safe testing space.
    2. Write a series of migration scripts to make the content model changes.
    3. Run these scripts in the testing environment to see how your app handles the changes.
    4. If the scripts are doing what you want, you can safely migrate the changes to production by marking your testing environment as production.

    See an example of migrating content model changes.

    Create an environment

    Creating an environment means that you essentially create a copy of a selected environment, such as Production. You can use the copy for development and testing purposes.

    You can create as many environments as your subscription plan allows. If you need to perform content model changes, we recommend using a code-first content migration.

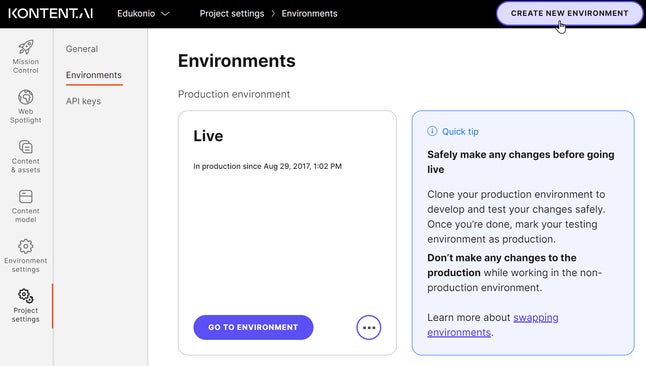
    To create a new environment, go to Project settings > Environments and click Create new environment. You can also clone an environment by clicking > Clone on the environment tile.

    Make sure to select roles of users that should be active in the new environment.

    Naming tips for new environments

    For better clarity, you might want to name your non-production environments based on one of the following criteria:

    • Tasks such as JRA-256, CTC-1234
    • Releases such as Release 2021-11-24, Release 2022/02
    • Functionality such as QA, Staging, UAT

    What happens when you create an environment?

    The new environment will contain all items, assets, types, snippets, taxonomies, collections, workflow, roles, and languages from the source environment. The content items will contain all their revisions, comments and suggestions, and tasks.

    The users from the source environment will be cloned and may be activated in the new environment. When creating an environment, you'll choose which users to activate by selecting their roles. Users with the Project manager role are always activate because project managers have access to the whole project.

    Preview URLs will be copied to the new environment in the same state as they were in the source environment. Webhooks will be copied to the new environment and set as disabled, so that the new environment doesn't trigger your production apps.

    What about subscription plan limits?

    Your subscription plan limits for content items and assets count only for the environment with the largest number of content items and assets. Bandwidth and API calls count for all environments.

    Select an environment in the UI

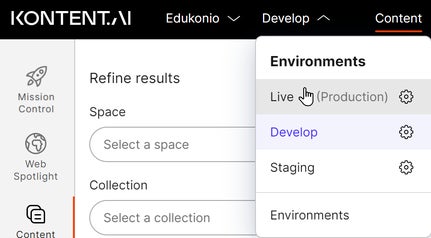
    If you have access to one or more environments in a project with multiple environments, you'll see a drop-down list for switching between your environments for the selected project.

    You can also switch among the environments in Project settings > Environments when you choose > Go to environment.

    Switching between environments

    Environment swap – mark environment as production

    With environment swap, you can mark any non-production environment as your new production environment. The new production environment will show at the top of the list when selecting environments

    Before you swap

    We recommend you start by cloning your production environment to create a safe non-production place. In this clone, you can then make the changes you want to see in production.

    You also need to do a content freeze. In other words, prevent your content creators from making changes in production. Otherwise, any change made to the production environment between the time you create the clone and the time you mark it as production, would be lost.

    Once you try and test everything in the non-production environment, you can mark this environment as production. Then you can stop the content freeze and allow your content creators to resume making content changes.

    What happens when you swap environments?

    When you mark a non-production environment as production:

    • Environment names don't change. Make sure to rename both the new production and the old now non-production environments to avoid confusion after the swap.
    • Content & assets, content model, and settings of the environments stay the same. This includes all items, assets, content types, snippets, taxonomies, collections, workflows, roles, languages, preview URLs, and webhooks.
      • You can choose to have webhooks enabled or disabled after the swap.
    • Project ID and API keys don't change for either of the environments. Your apps will continue to work without interruption. However, the ID and keys are different for each environment. Make sure to update them in your app after the swap so the app uses the production ID and keys.
    • Users and their status are carried over from the original production. Those active in the original production are activated in the new production. Similarly, the inactive users remain inactive.
    • Users that exist ONLY in the original production environment will NOT appear in the new production environment after the swap.

    Please note that you can't use a custom asset domain together with the environment swap feature. That's because, after each swap, it'd be necessary to set up new HTTPS certificates.

    How to swap environments

    To mark a non-production environment as production, go to Project settings > Environments and click Mark as production on a non-production environment.
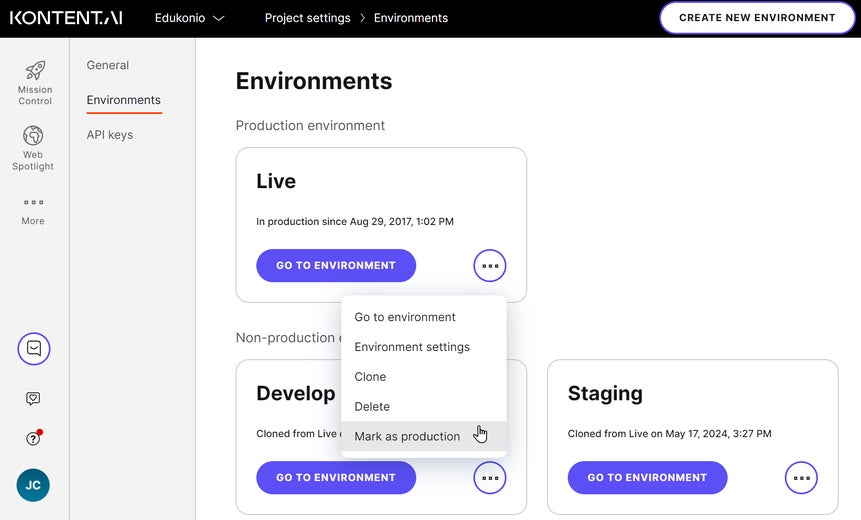
    If you want to disable your webhooks for the new production environment, unselect Enable webhooks after the swap is done. Otherwise, the webhooks will be enabled.

    Example of environment swap

    Imagine you have a project with two environments, Live and UAT. Live is used for production purposes whereas UAT is your recently cloned environment with a modified content model.

    Schema of UAT and Live environments before swapping them.

    The Live and UAT environments before the swap. The production environment is in blue.

    Notice that the Live environment has an extra user Ron who wasn't invited to the UAT environment. After the swap, Ron won't be carried over to the new production environment.

    When you mark the UAT environment as production, the contents and settings of the Live and UAT environments stay the same. Make sure to rename the environments after the swap to avoid confusion.

    Schema of UAT and Live environments after swapping them.

    The Live and UAT environments after the swap. The production environment is in blue.

    Users who were in both environments kept their (in)active states from the original production environment.

    Safely change content model in production

    Making content model changes directly in production can be risky. To mitigate that risk, we recommend you clone your production environment, make your changes in the clone, validate and test, and swap the two environments. This approach works well for both small and complex changes.

    To migrate your content from one content model to another, you need to write migration scripts. This code-first approach is similar to handling database migrations. For example, when you migrate a database, you create a copy of the database and run your script against the copy before running it against the original. It's the same with environments, but without running migration scripts against production.

    Changes made in one environment are not synchronized to other environments out-of-the-box. To migrate changes from one environment to another, you swap the two environments.

    Example of content model migration

    Let's say you have a project with blog articles. Each article has an author typed manually as “Jane Doe” into a text element. At some point, you decide you want to include additional information about the authors, such as their bio and profile image.

    It would be tedious to add these details to each article one by one. You instead create a new content type called Author and link the Author content items to the articles.

    As this is a change of the content model, you want to first test everything in a separate environment before committing it to production. Here's how to do it:

    1. Create a non-production environment

    Create a new testing branch of your app code and clone your production environment to set up a development sandbox.

    2. Create migration scripts to adjust your content model

    Write migration scripts. You'll use these scripts in the next steps for changing the content model and for migrating your content from the old model to the new one.

    A migration script is a set of instructions using Kontent.ai CLI where you programmatically define changes to the content model you want to do. These scripts are also useful for migrating content from the old content model to the new one.

    We recommend you check out the Kontent.ai Migrations Boilerplate. The boilerplate contains a series of migration scripts for each step of this example migration:

    1. Create a content type for authors.
    2. Add a linked items element to the content type of articles.
    3. Migrate the data – extract names of article authors, create a content item for each name, and link it in its respective articles.
    4. Remove the text element for authors' names that's not needed anymore.

    Why not just one script that handles it all?

    It's a good practice to have one migration script per task. That way you know better where to look when something fails.

    3. Run the migration scripts

    Run the migration scripts to update and migrate your content model and data.

    Safety first!

    Make sure to run the migration scripts against the development environment, not the production one. Each environment has its own set of API keys.

    4. Validate the migration scripts

    When your migration scripts are doing what you want under the non-production environment, it's time for a double check. Create a new staging environment by cloning the production environment afresh. Then run your migration scripts against the new staging environment.

    Freeze all motor functions

    At this point, we recommend you perform a content freeze on your production environment. That is prevent your content creators from making any content changes in production.

    Although non-critical, this step allows you to make sure that all is going to end well. The production environment has probably changed while you were writing the migration scripts – it's good to check the scripts work with the latest content from production.

    5. Mark the staging environment as production

    Now, if your migration scripts did what you want in the staging environment, you can mark the staging environment as production.

    After you mark the staging environment as production, remember to rename the two environments. Also, merge your app code branch to main.

    6. Clean-up

    You're done with the migration and your production content model is updated. Your content creators can make changes again.

    All that's left is to clean up. Delete the staging and development environments because they're not needed anymore. You'll create new ones the next time you need to change your content model.

    What's next?

    Should you clone your project or create environments?

    Although project cloning and environments work similarly, they serve a different purpose.

    • Use environments to prepare changes for your production project in a safe place. Your developers then take care of propagating those changes to the production project.
    • Use project cloning to create new standalone projects for content production. For example, if you want to run projects based on a similar content model but with slightly different content.